🧱 Migration Guide: Vue2/Nuxt2/Vuetify2 to Vue3/Nuxt3/Vuetify3
 As technology evolves, so must our projects.
With Vue 2 support coming to an end on December 31st, 2023, it becomes imperative for us to migrate our projects to the latest Vue 3, Nuxt 3, and Vuetify 3.
In this blog, I will share my experience and insights gained while migrating the project based on an existing codebase, from tackling Nuxt 3 updates to addressing Vue 3 breaking changes and adapting to Vuetify 3. I navigated through numerous hurdles and discovered effective solutions, as a result, I will also share the challenges encountered and the strategies employed.
Background
Before going ahead with the migration, I extensively researched various technical blogs and almost all of them recommended migrating the code after creating a new project, cause there might be too many errors🐞 and could not figure out which module was causing the error or if it was something else.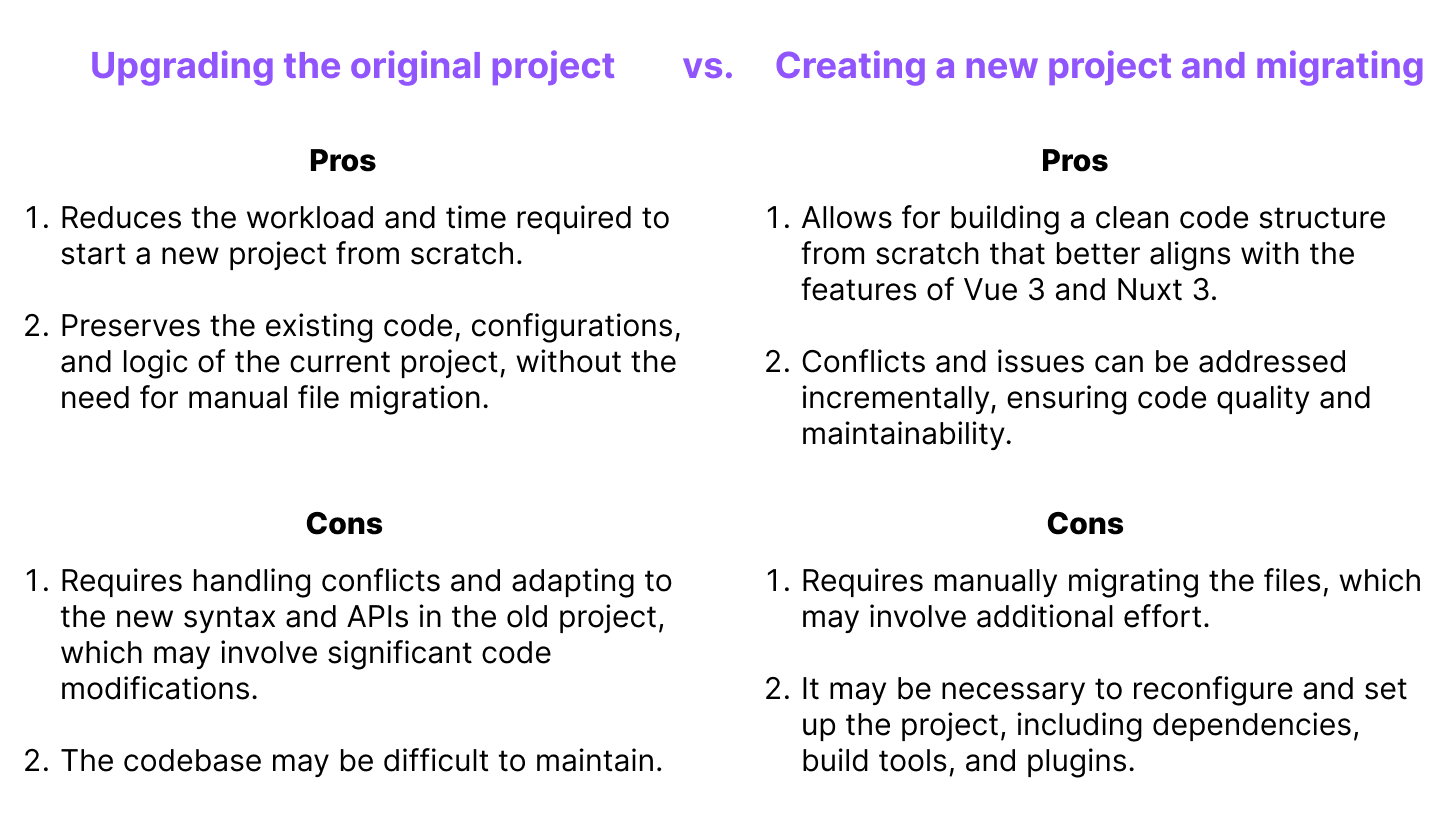
But after weighing the pros and cons, I made the decision to upgrade the project based on our old codebase, mainly because our codebase already uses the composition api syntax by @nuxt/composition-api using TypeScript, and have also introduced auto-imports. It proved to be a very bold decision💥, as I was not able to validate the changes I made for quite some time, and in fact I did not actually get the project up and running until after I had completed most of the nuxt 3 and vue 3 migrations. But fortunately, I did succeed 🎉.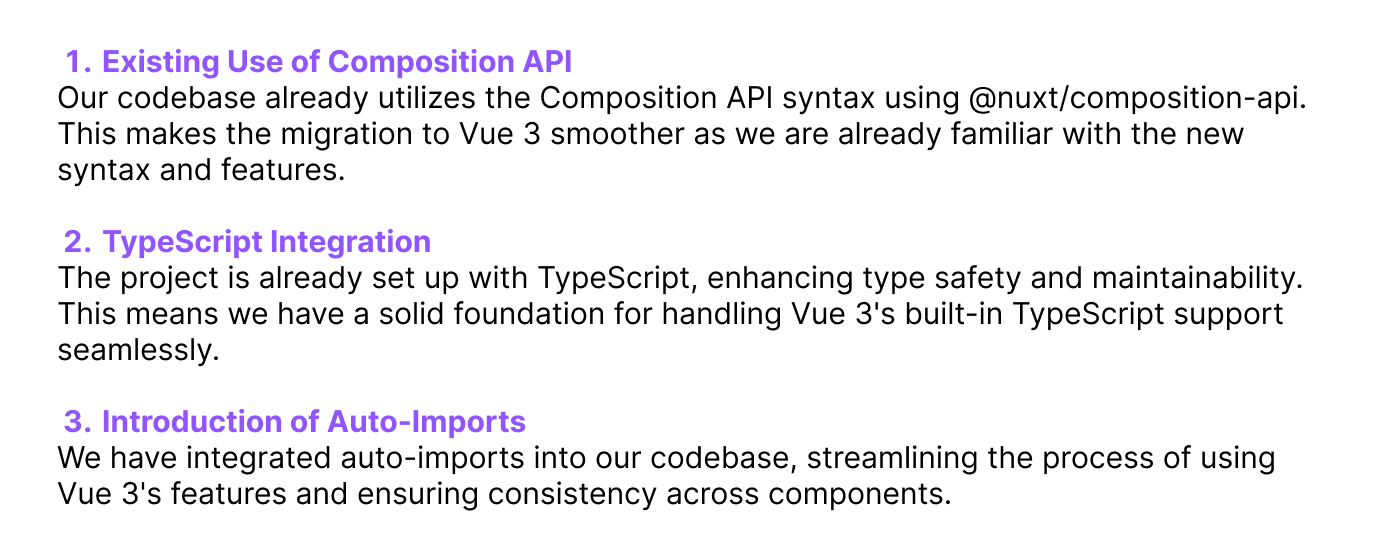
Before Migration
- Learn about Nuxt 3
- It allows to experience TypeScript with zero configuration.
- Nuxt 2 uses webpack 4 and Babel, Nuxt 3 switched to Vite (or webpack 5) and esbuild. Vite is the default choice but you can still use webpack 5.
- It uses Nuxi for Command line interface. It is like the Vue CLI but for Nuxt.
- It uses Nitro as the server engine, offering cross-platform support for Node.js, browsers, service workers and more.
- It uses Nuxt Kit that provides users with a new flexible module development experience with cross-version compatibility.
- It uses Nuxt Bridge to ease the migration from Nuxt 2.
- Prerequisites Node.js - v16.10.0 or newer
- Learn Vue 3 Composition API
- As Nuxt 3 is built on Vue 3, understanding the changes and enhancements in Vue 3 is essential. Pay attention to the Composition API, which offers a more flexible and powerful way to organize and manage your code.
- Learn about TypeScript
- Nuxt 3 is written in TypeScript, and having a basic understanding of TypeScript will be beneficial. Being able to read and understand TypeScript code will help you navigate through Nuxt 3’s source code and address any potential issues that may arise during the migration process.
- Migrating your code to TypeScript is highly recommended due to its enhanced type safety, improved developer experience with autocompletion and type inference, early detection of errors during development, robust tooling support, and its ability to maintain code scalability and readability as projects grow in complexity. TypeScript adds clarity and structure to the codebase, ultimately leading to more reliable and maintainable applications.
- Learn about Modules
- Nuxt 3 requires ECMAScript modules (ESM), which may require converting CommonJS modules (CJS) used in your project. Learn about the differences between these module systems and how to migrate your modules to ESM.
- Try to set up a demo project
- 👍👍👍 Having a demo project before migration is an excellent idea, especially when dealing with complex and large-scale projects. Here’s an example demo project including Vue 3, Nuxt 3, Vuetify 3, Pinia, pwa and firebase authentication: 👉 github repo, see more details in this blog.
- It allows you to experiment and isolate specific packages or modules, helping you identify the source of issues more effectively. When facing challenges in the migration process, the demo project serves as a safe playground to troubleshoot and find solutions without impacting the main project.
- This experimental approach fosters a deeper understanding of potential pitfalls and ensures a smoother migration for the main project, ultimately saving time and minimizing risks.
Resources
📖 Keeping the migration guide open and referring to it throughout the process will help you avoid common pitfalls and ensure a smoother transition.
Vue 3
Nuxt 3
Vuetify 3
Migration Plan
0. Abstract reusable components
- Abstract recurring code patterns into reusable components.
1. Nuxt 3 Migration
- Update Nuxt 3 configurations.
- Adapt the codebase to address breaking changes introduced in the latest version.
2. Package Upgrades and Replacements
- Upgrade package versions to their Vue 3-compatible equivalents.
- Identify and replace packages that may not be compatible with Vue 3 or have alternative solutions available.
3. Integration of New Configurations
- Integrate the updated router, i18n, pinia, pwa, firebase, and other configurations to align with Nuxt 3.
4. Vue 3 Migration
- Begin the migration by updating the project’s codebase to work with Vue 3.
- Rewrite all components using the “script setup” syntax introduced in Vue 3.
5. Test Project Setup
- Attempt to run the project.
- Address any issues or conflicts that may arise during the testing phase.
6. Vuetify 3 Migration
- Follow the migration guide to adjust the code syntax of each component.
- Integrate the latest theme configuration.
- Explore alternative solutions for components that have not been fully migrated yet.
7. Style Restoration
- Restore any customized styles or appearance adjustments to maintain the project’s original look.
Nuxt 3 Changes Checklist

To get the project set up as quickly as possible, I focused on the nuxt 3 migration firstly. Here is a checklist outlining the major changes required. Nuxt 3 introduces several significant changes and improvements that require careful consideration during the migration process. In this section, I will present a checklist detailing the key modifications needed to adapt the project to Nuxt 3.
Configuration
- nuxt.config
- Migrate to the
defineNuxtConfigfunction. - Migrate
router.extendRoutesto the newpages:extendhook.
- Modules
- Move all
buildModulesintomodules. - Check for Nuxt 3 compatibility of modules. [we will do it later]
- TypeScript
- Add
"extends": "./.nuxt/tsconfig.json"totsconfig.json.
Auto Imports
- Nuxt Auto-imports
- Nuxt auto-imports functions and composables to perform data fetching, get access to the app context and runtime config, manage state or define components and plugins.
- Vue Auto-imports
- Vue 3 exposes Reactivity APIs like ref or computed, as well as lifecycle hooks and helpers that are auto-imported by Nuxt.
Meta Tags
- In
nuxt.config, renamehead=>meta. - Access the component state with
head=>useHead.
Plugins and Middleware
- Plugins
- Migrate plugins to use the
defineNuxtPluginhelper function. - Remove entries in
nuxt.configplugins array that are at the top level of plugins/ folder.
- Route Middleware
- Migrate route middleware to use the
defineNuxtRouteMiddlewarefunction. - Reference route middleware using
definePageMeta. - File name with extension
.clientand.server.
Pages and Layouts
- Layouts
- Replace
<Nuxt />with<slot />. - Use
definePageMetato select the layout used by the page. - Move
~/layouts/_error.vueto~/error.vue.
- Pages: Dynamic Routes
- Replace
_idwith[id]to define a dynamic route parameter. - Replace
_.vuewith[...slug].vueto define a catch-all route.
Runtime Config
- Add environment variables to the
runtimeConfigproperty of thenuxt.config. - Migrate
process.envtouseRuntimeConfig. - Exposing Runtime Config using
runtimeConfig.public.
Build Tooling
- Remove
@nuxt/typescript-buildand@nuxt/typescript-runtimefrom dependencies and modules. - Remove any unused babel dependencies.
- Remove any explicit core-js dependencies.
- Migrate
requiretoimport.
Server
- Any files in
~/server/apiand~/server/middlewarewill be automatically registered, so you can remove them fromserverMiddlewarearray.
Vue 3 Changes Checklist
 Vue 3 comes with several breaking changes compared to Vue 2, which may necessitate adjustments to the project's existing codebase. In this section, I will provide a checklist of these breaking changes and the corresponding solutions or workarounds.
v-model
- replace
.syncwithv-model.
nuxt2:<ChildComponent :title.sync="pageTitle" />
nuxt3:<ChildComponent v-model:title="pageTitle" /> - for all v-models without arguments, make sure to change props and events name to
modelValueandupdate:modelValuerespectively.
key
- no longer recommend using the key attribute on v-if/v-else/v-else-if branches, since unique keys are now automatically generated on conditional branches if you don’t provide them.
- when using
<template v-for>with a child that usesv-if, the key should be moved up to the<template>tag.
v-if vs. v-for Precedence
- If used on the same element,
v-ifwill have higher precedence thanv-for.
nuxt2:v-forwould take precedence.
nuxt3:v-ifwould take precedence.
v-bind Merge Behavior
- Order of bindings for
v-bindwill affect the rendering result.
template:<div id="red" v-bind="{ id: 'blue' }"></div>
result:<div id="blue"></div>
template:<div v-bind="{ id: 'blue' }" id="red"></div>
result:<div id="red"></div>
v-on.native modifier removed
- The
.nativemodifier forv-onhas been removed. - Remove all instances of the
.nativemodifier. - Ensure that all your components document their events with the emits option.
Render Function API
his now globally imported.- No domProps, the entire VNode props structure is flattened.
Slots Unification
this.$slotsnow exposes slots as functions.this.$scopedSlotsis removed.- Replace all
this.$scopedSlotsoccurrences withthis.$slotsin 3.x. - Replace all occurrences of
this.$slots.mySlotwiththis.$slots.mySlot().
Inline Template Attribute
- Support for the inline-template feature has been removed.
$children
$childreninstance property has been removed and is no longer supported.
$listeners removed
$listenershas been removed.- Event listeners are now part of
$attrs. - Remove all usages of
$listeners.
Events API
$on,$offand$onceinstance methods are removed.- Component instances no longer implement the event emitter interface.
What’s New in Vue 3
Async Components
defineAsyncComponenthelper method that explicitly defines async components.- component option renamed to loader.
- Loader function does not inherently receive resolve and reject arguments and must return a Promise.
emits Option
- For components that re-emit native events to their parent, this would now lead to two events being fired.
Vuetify 3 Changes Checklist

It is essential to address the changes in Vuetify 3. However, it is important to note that Vuetify 3 is still under development, and some components may not be fully available yet. Here’s a checklist of the changes and updates.
A => B means A has been renamed to B.
v-expansion-panel
v-expansion-panel-header=>v-expansion-panel-title.v-expansion-panel-content=>v-expansion-panel-text.
v-menu
- offset-y, offset-x props =>
offsetprop
v-img
containhas been removed and is now the default behavior. Usecoverto fill the entire container.
v-tabs
v-tab-itemhas been removed, usev-window-item.
Input components
validate-on-blurprop has been renamed tovalidate-on="blur".- Variant props filled/outlined/solo have been combined into
variantprop.
v-select/v-combobox/v-autocomplete
v-modelnot present in items will now be rendered instead of being ignored.item-text=>item-title- The item slot will no longer generate a
v-list-itemcomponent automatically, instead a props object is supplied with the required event listeners and props.
v-list
v-list-item-iconandv-list-item-avatarhave been removed, usev-list-itemwith icon or avatar props, or useappendorprependslot.v-list-item-contenthas been removed, use CSS grid for layout now instead.v-subheader=>v-list-subheader.
v-form
validate()now returns aPromise<FormValidationResult>instead of a boolean.
v-checkbox/v-radio/v-switch
input-value=>model-value.
v-btn/v-btn-toggle
fabis no longer supported.flat,outlined,text,plainprops have been combined intovariantprop.
Layout
stateless,clipped,clipped-rightandappprops have been removed fromv-navigation-drawer,v-app-barandv-system-bar.
v-data-table
- Should add
items-per-page-text="Rows per page:"to change the text. item-key=> addidto items.- In items array
text=>title,value=>key. - Slot
expanded-item=>expanded-row,header=>columns.
Modules Compatibility
Ensuring the compatibility of third-party modules and plugins is crucial for a seamless transition. By upgrading, removing, or replacing modules as needed, we can maintain the project’s functionality and avoid potential conflicts.
For the modules named start with @nuxt, you can search for it here.
- Modules Removed
- @nuxtjs/eslint-config-typescript removed
- @nuxtjs/composition-api removed
- @nuxt/typescript-build removed
- @nuxtjs/axios removed
- @nuxt/types removed
- vue-i18n removed
- vuexfire removed
- vue-server-renderer removed
- vue-template-compiler removed
- Modules Replaced
- vue-chartjs => vue-chart-3
- vue-apexcharts => vue3-apexcharts
- vue2-perfect-scrollbar => vue3-perfect-scrollbar
- vue-jest => @vue/vue3-jest guide
- pinia-plugin-persistedstate => pinia-plugin-persistedstate/nuxt guide
- @nuxtjs/pwa => @vite-pwa/nuxt guide
- Modules Upgraded
- nuxt => ^3.5.2
- vue => ^3.3.4
- pinia => ^2.1.3
- vuetify => ^3.3.3 guide
- @nuxtjs/i18n guide
- @vueuse/nuxt => ^10.1.2 guide
- @pinia/nuxt => ^0.4.11
Challenges and Solutions
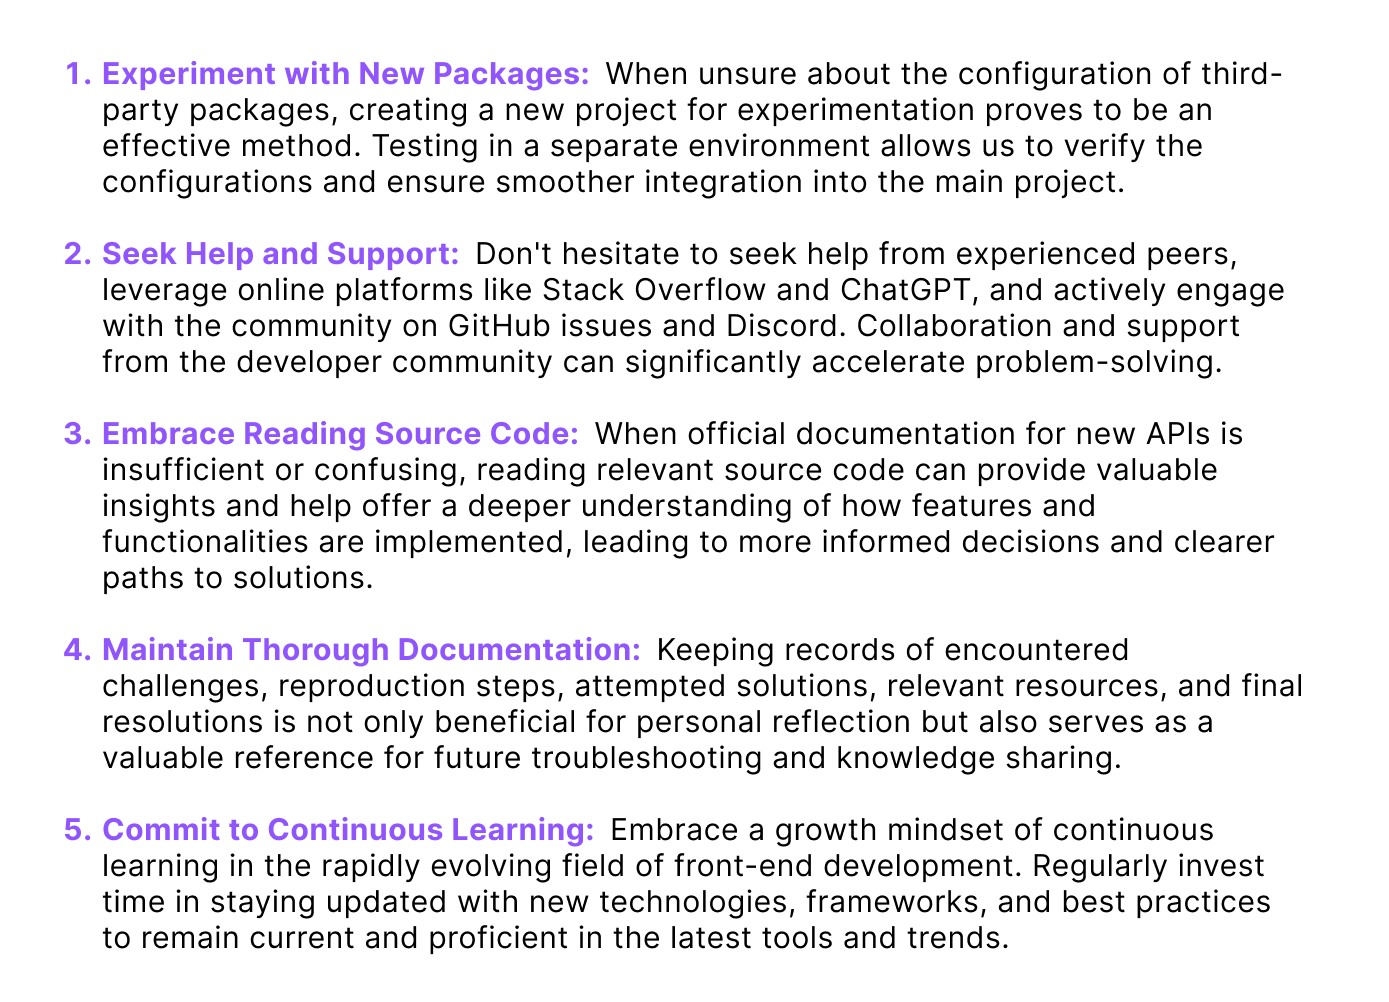
During the migration, I encountered several challenging issues that were not readily addressed in the official documentation. To find solutions, I proactively sought assistance from various sources, including the GitHub repository issues, the official Discord community, and Stack Overflow. In some cases, I even delved into the source code to gain a deeper understanding. Here are some of the questions I encountered and the corresponding answers I discovered.

❓ Refactoring Options API to Composition API
While the Options API remains functional in Vue 3, leveraging the Composition API offers significant advantages, especially for larger codebase. The Composition API is a built-in feature in Vue 3 and is also available in Vue 2 through the @vue/composition-api plugin.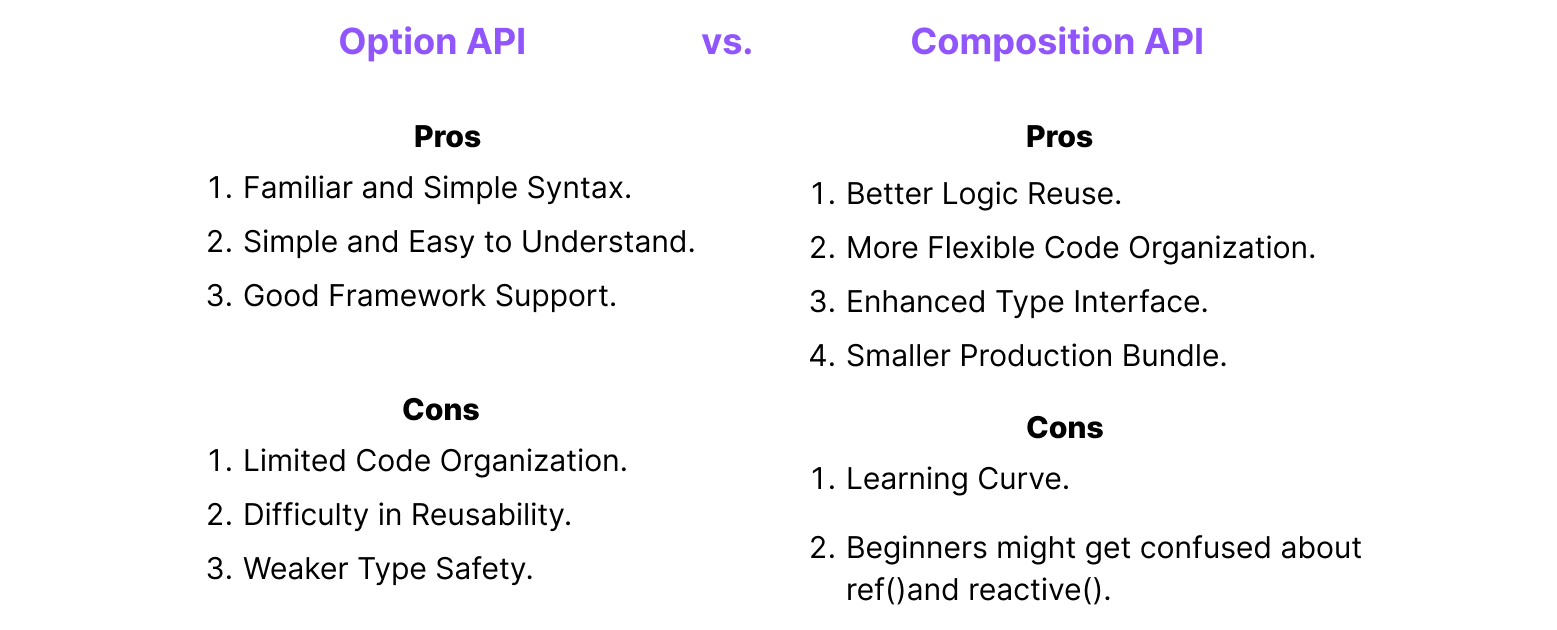
Let’s see a basic example to understand the difference of coding structure between Options API and Composition API, the specific code images reference is from here: Arcana Network Blog.
1. Code in the Options API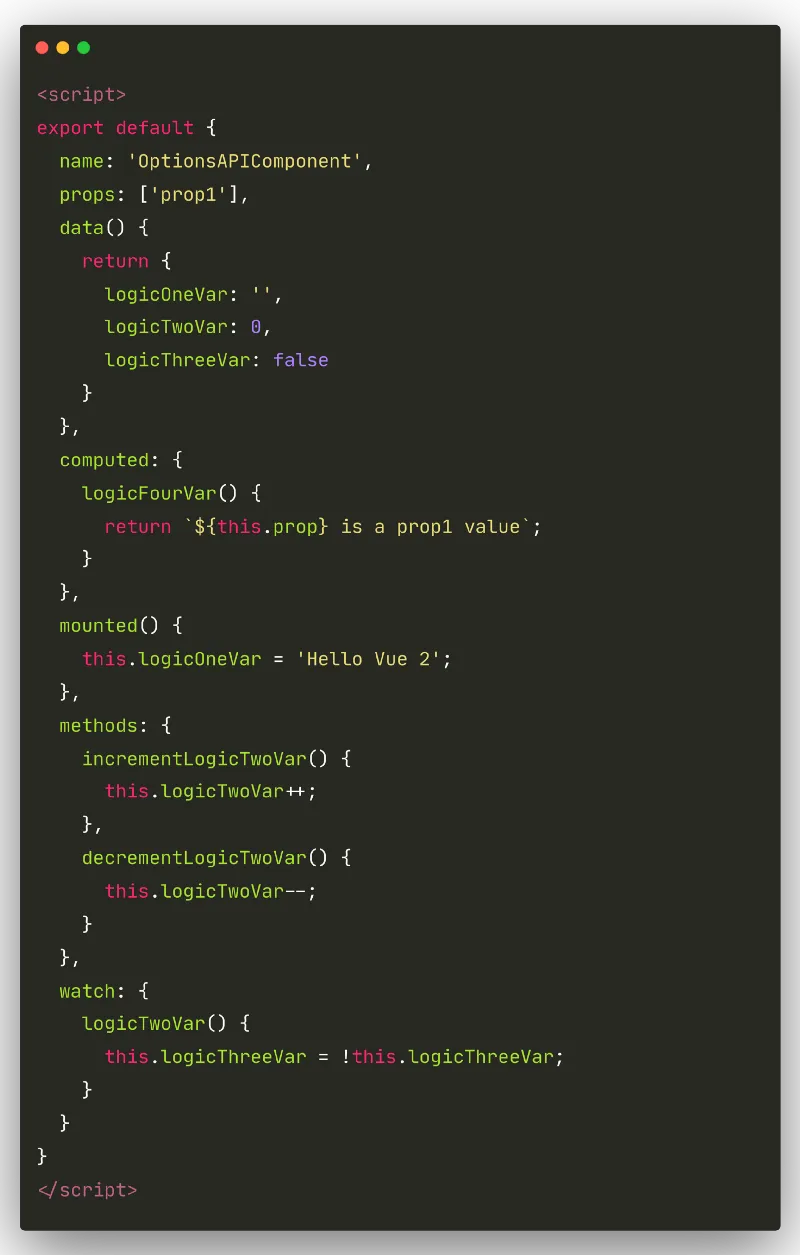
2. Code in the Composition API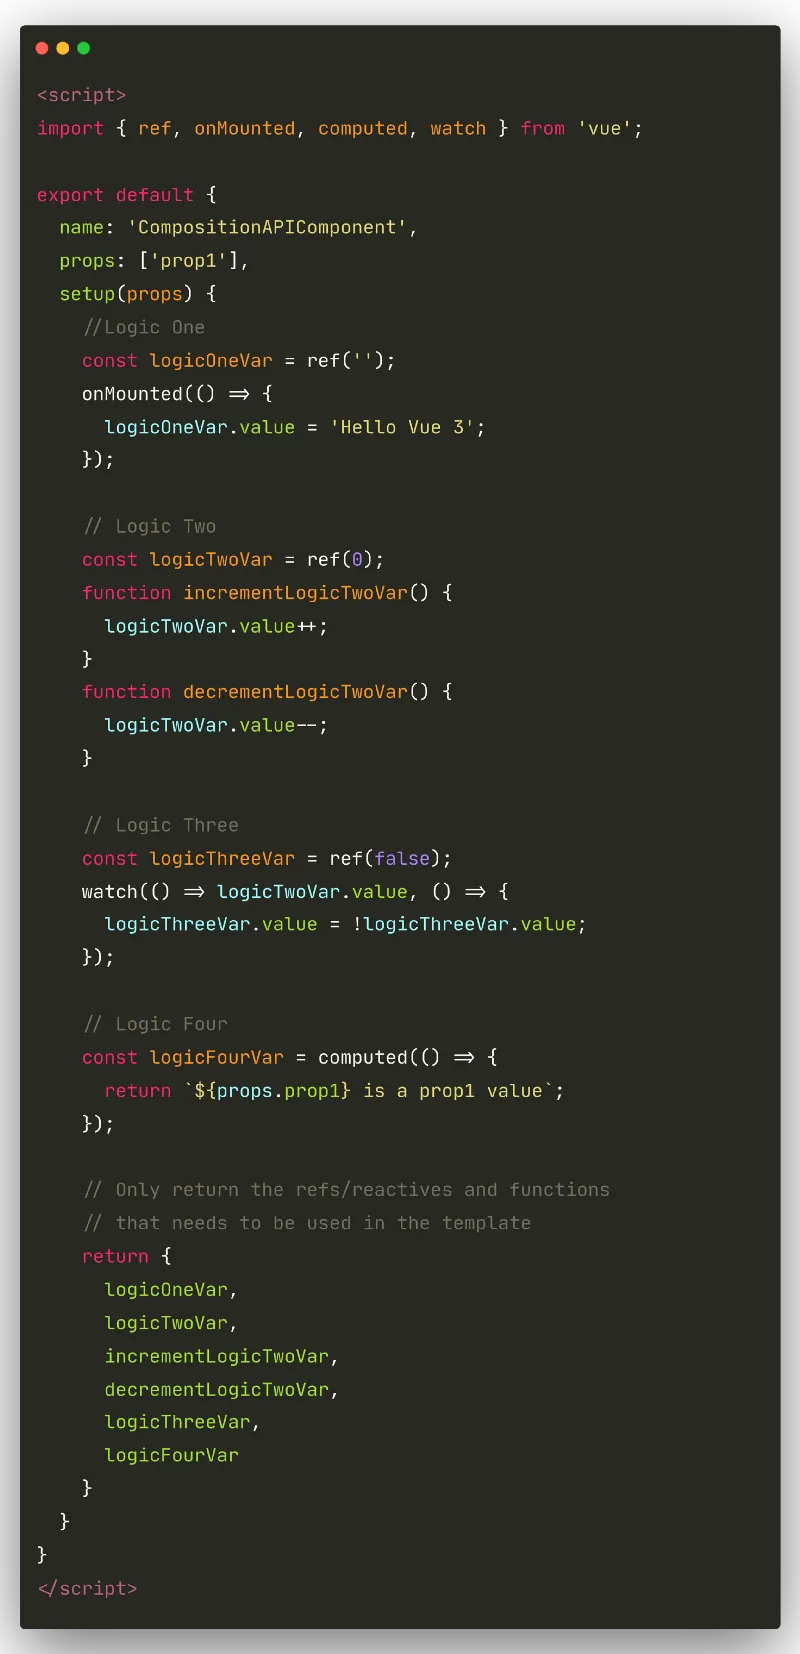
3. Simplified the above code by using the <script setup> syntax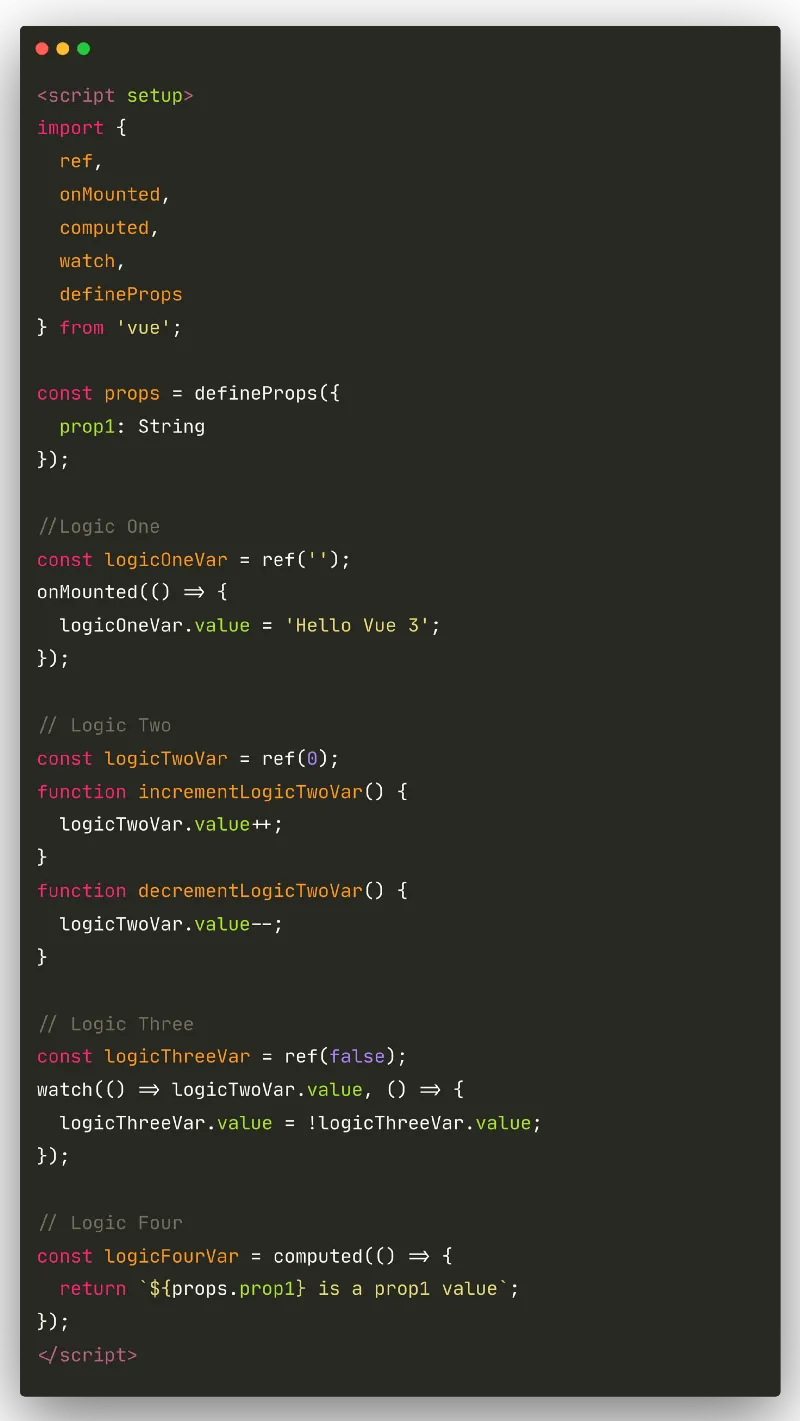
❓ How to inject in context in Nuxt 3
In Nuxt 2, we used to use useContext to access the Nuxt context within the composition API, such as:
1 | // plugins/hello.js |
In Nuxt 3, we can access runtime app context within composables, components and plugins, such as:
1 | // plugins/hello.js |
❓ How to use dynamic components in Vue 3
In Vue 2, we define the dynamic components in the components property, such as:
1 | export default { |
In Vue 3, we can use defineAsyncComponent function, which accepts a loader function that returns a Promise.
1 | const MyComponent = defineAsyncComponent(() => import('my-component')) |
❓ How to use labs components in Vuetify 3
1. Way 1: Import and bootstrap v-data-table in your component:
1 | <script setup> |
2. Way 2: Make the component available globally by importing it in Vuetify plugin.
1 | import { createVuetify } from 'vuetify' |
❓ How to define themes in Vuetify 3
Define the themes in plugins/vuetify file, light and dark are pre-installed in Vuetify 3, and you can change the color of them as following:
1 | // plugins/vuetify.ts |
To get the ‘something’ color under colors, you can do like this:
1 | .your-class-name { |
To change the theme by clicking, you can do like this:
1 | <template> |
❓ How to migrate useFetch from @nuxt/composition-api to Nuxt 3
In Nuxt 2, I use useFetch API from @nuxt/composition-api, like this:
1 | <template> |
In Nuxt 3, there are many replacements, such as useAsyncData and useFetch that are auto-imported in Nuxt 3 project.
1 | <template> |
What’s more, we can define options in useAsyncData including lazy, transform, watch. See more here.
❓ Error: v-on with no argument expects an object value
I got this warning in console when page first rendered, and it led to the problem that the menu doesn’t show when button is clicked, same problem for v-tooltip. After diving into the Vuetify 3 documentation, I found the solution in the upgrade guide, there’s a general change for components:
- Activator slots work slightly different.
- Replace
#activator={ attrs, on }with#activator={ props }, then removev-on="on"and replacev-bind="attrs"withv-bind="props".Related issue: here1
2
3
4
5
6
7
8
9
10
11
12
13// before
<v-tooltip>
<template #activator="{ on, attrs }">
<span v-on="on" v-bind="attrs">{{ title }}</span>
</template>
</v-tooltip>
// after
<v-tooltip>
<template #activator="{ props }">
<span v-bind="props">{{ title }}</span>
</template>
</v-tooltip>
❓ Error: Transition renders non-element root node that cannot be animated
Just keep there is only one root element.
1 | <template> |
❓ Error: Cannot read _leaveCb property
This error happened when using watch to refresh the data and assign a value to template. Both of these give an error, but disappeared if remove watch:
watch(props, refresh);.- add
watch: [props]withinuseAsyncData.
I have tried all the solutions mentioned in similar issues, but only one of them works for me: Add <ClientOnly> around the component.
Related issues: nuxt issue, vue-router issue.
❓ Error: localStorage is not defined in nuxt server-side
When you use SSR you don’t have access to the browser storage, localStorage can only work on client side when process.client is true.
Lessons Learned
Conclusion
The migration from Vue 2/Nuxt 2/Vuetify 2 to Vue 3/Nuxt 3/Vuetify 3 has been a challenging but highly rewarding journey. By choosing to upgrade the project from its existing codebase, I was able to preserve valuable configurations, logic, and functionality, saving time and effort that would have been required to start from scratch.
Throughout the migration process, I have navigated through various aspects, including Nuxt 3 changes, Vue 3 breaking changes, Vuetify 3 updates, and package adjustments. By leveraging the official documentation, seeking support from my mentor 💪, and also the discussion form the community like GitHub, StackOverflow, and Discord, I overcame obstacles and found solutions to intricate problems.
Migrating a project of this scale required patience, perseverance, and attention to detail. At times, I faced moments of frustration and uncertainty 😢, but with determination and the guidance of my mentor, I stayed focused on the goal 🎯. The adoption of TypeScript in the Nuxt 3 project further enhanced code safety and maintainability, ensuring a more robust codebase. 🔝
As I progressed through each migration phase, I carefully integrated new versions, refactored components using the Composition API, and verified functionality through rigorous testing. This meticulous approach ensured a successful transition to Vue 3 and Nuxt 3, unleashing the full potential of their features.
This migration project has taught me valuable lessons in staying adaptable, seeking support, problem-solving, and the importance of continuous learning to keep our projects at the forefront of web development. 👍 And thanks again for my mentor R.J. for his unwavering support, guidance, and belief in my abilities, without which this achievement would not have been possible. I’m truly grateful for his time and encouragement throughout this remarkable journey. 😄

References:
- Nuxt 3 Migration Simplified: A Cheat Sheet
- Vue3 / Nuxt3 / Vuetify3 Migration Steps
- Migrating from Nuxt 2 to Nuxt 3
- Vue 3 Composition API: Basics and Patterns
- 100 Things You Should Know About Nuxt 3
- Vuejs 3: Migrating from Options to Composition API
- Mastering Nuxt 2 Course and Mastering Nuxt 3 Course.
- Nuxt 3 with SSR on Google Cloud Firebase Functions (2023)
- Deploy Nitro apps to Firebase.
🔍 Check out the demo project in github.
📮 If find any errors, please feel free to discuss and correct them: biqingsue@[google email].com.