🧚♀️ Computer Graphics: Texture Mapping in WebGL
Texture mapping is the process of applying a 2D image to a 3D model, and is a crucial part of creating visually appealing 3D graphics. However, it can also be one of the most frustrating parts of working with WebGL, particularly when it comes to solving common problems like texture distortion or mapping errors.
In this tutorial, we’ll explore the basics of texture mapping in WebGL, and provide solutions for some of the most common problems you might encounter. I hope my article can help you have a better understanding of texture mapping in WebGL.
Load Textures
Download image
1 | function initTextures(url) { |
❓Possible problem
ERROR: The image element contains cross-origin data.
WebGL just bans all images that are not from the same domain(CORS).
The easiest solution is to set the crossOrigin attribute to “anonymous” which means ask for permission but don’t send extra info. And then when the browser tries to get the image from the server, if it’s not the same domain, the browser will ask for CORS permission. What’s more, We can make a judgement here that checks if the image we’re trying to load is on the same origin and if so sets the crossOrigin attribute.
1 | if ((new URL(url, window.location.href)).origin !== window.location.origin) |
gl.pixelStorei
gl.pixelStorei(gl.UNPACK_FLIP_Y_WEBGL, true): Flip the orientation of the image on the Y axis. [MDN]
The texture coordinates are independent of the size of the image itself, the upper right corner is always (1.0, 1.0) regardless of the image size. Browsers copy pixels from the loaded image in top-to-bottom order just like the left one, but the t-axis of the texture coordinate system in WebGL is opposite to the y-axis of the image coordinate system like the right one, so we need to flip the image first to map the image to the graphics correctly.

❓Possible problem
ERROR: Still rendering in wrong order.
I tried to invert the y-axis of the image directly using the image preprocessing functions in WebGL, named pixelStorei. But this is still different from the target output, so I did one more step, Let x be equal to 1 minus x in the vertex shader.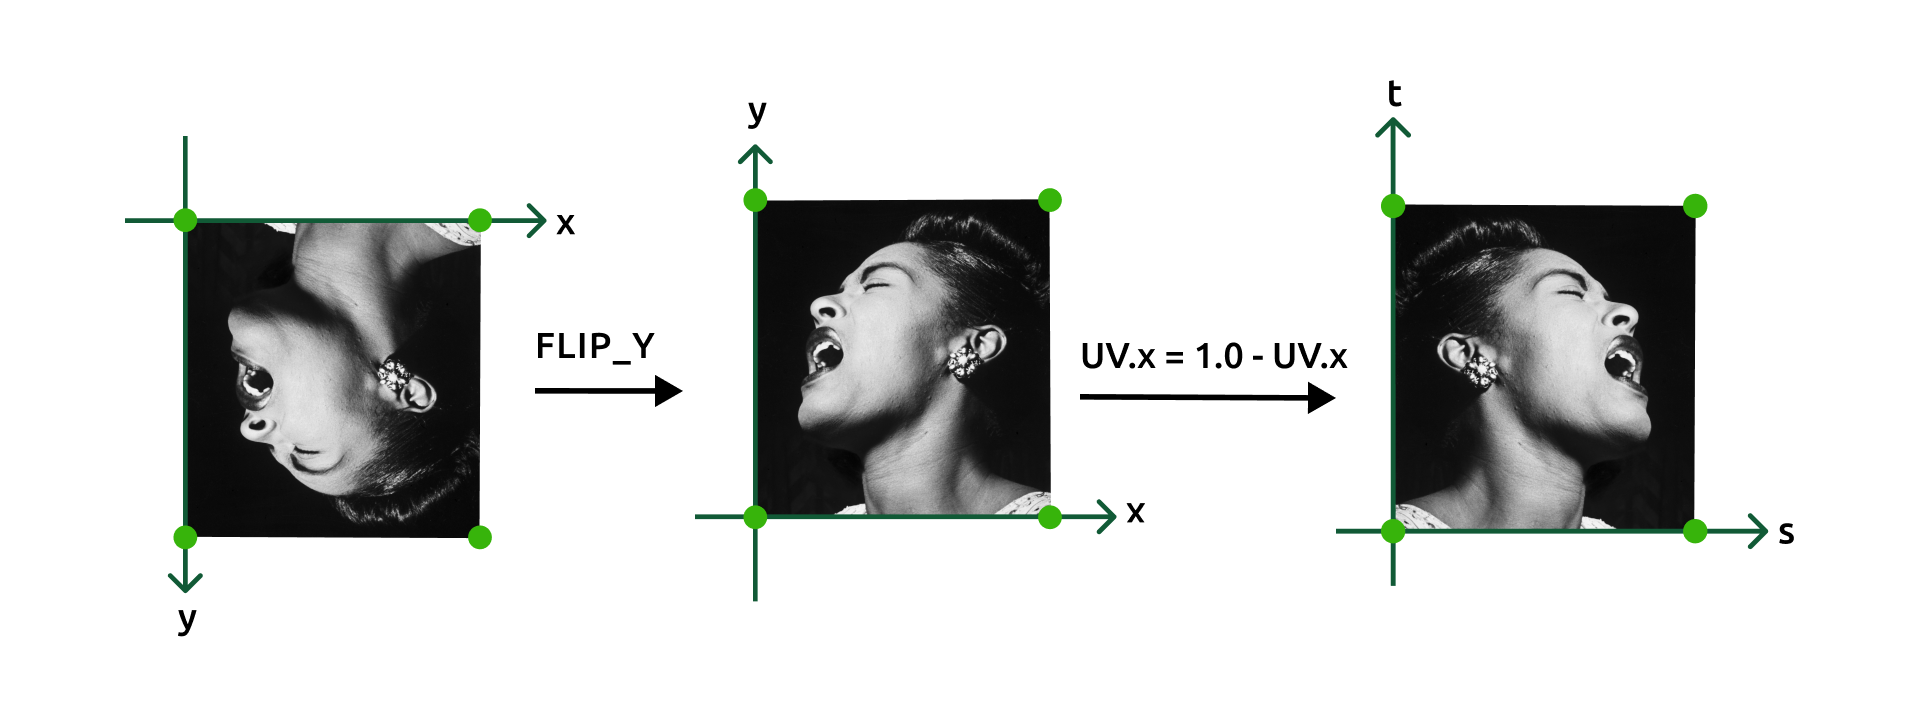
1 | gl.pixelStorei(gl.UNPACK_FLIP_Y_WEBGL, 1) |
Of course, we can also make changes directly in the vertex shader without flipping the color map.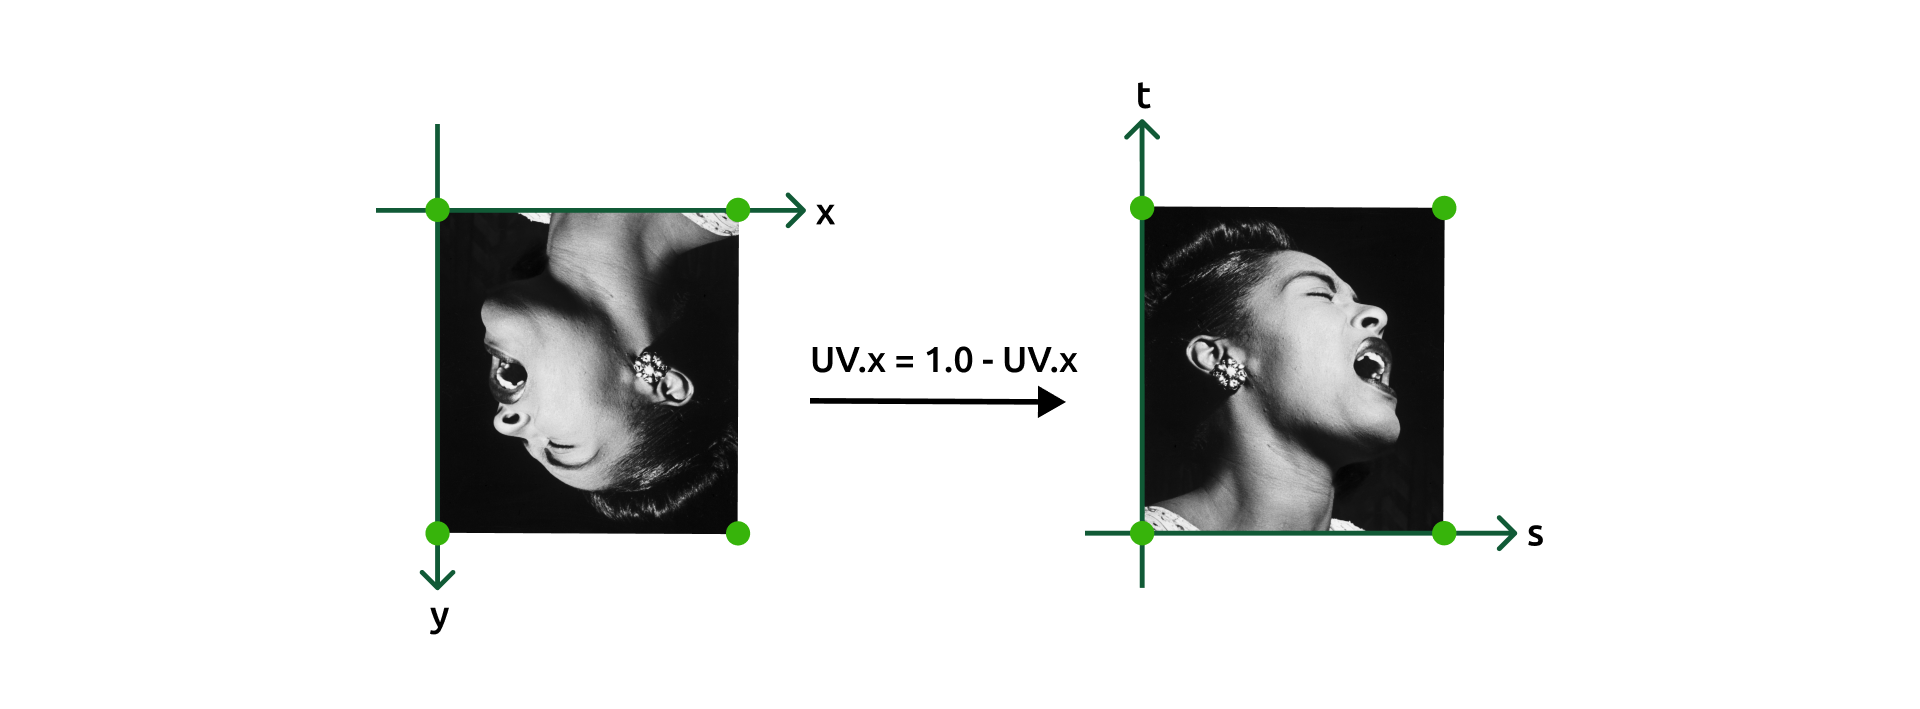
1 | vTexture = vec2(aTexture.x, 1.0 - aTexture.y); |
gl.activeTexture
gl.activeTexture(gl.TEXTURE0): Make the “texture unit” 0 be the active texture unit. [MDN]
WebGL uses multiple textures at the same time through texture units. Each texture unit has a number to manage a texture object, and the built-in variables gl.TEXTURE0 to gl.TEXTURE7 each represent a texture unit. Before a texture unit can be used, gl.activeTexture(gl.TEXTURE0) needs to be called to activate it. Only the active object can be modified or used.
gl.bindTexture
gl.bindTexture(gl.TEXTURE_2D, texture): Make the “texture object” be the active texture object. [MDN]
In WebGL we can’t manipulate texture objects directly, we have to bind texture objects to texture units and then manipulate texture objects by manipulating texture units. This also declares that the texture object will hold a texture of type gl.TEXTURE_2D. The type of the texture, gl.TEXTURE_2D, can’t be changed after this initialization. [learnwebgl]
gl.texParameteri
Configure the parameters of the texture object: how to get the texture color according to the texture coordinates, which way to repeat the texture filling. [MDN] When a pixel corresponds to many texture pixels, regardless of NEARES or LINEAR, jaggedness will be a problem. The solution is to use small size textures so that each pixel does not correspond to many pixels. However, for objects close to the observer, small size textures can cause texture stretching, which looks like a blocky effect or blurring effect.
1 | gl.texParameteri(gl.TEXTURE_2D, gl.TEXTURE_WRAP_S, gl.CLAMP_TO_EDGE); |
❓Possible problem
ERROR: The texture is a non-power-of-two texture.
In WebGL, non-power-of-two textures are allowed, but there are limitations: Mipmap cannot be used if texture is non-power-of-two. The only repeat mode allowed is gl.CLAMP_TO_EDGE.
1 | if (isPowerOf2(image.width) && isPowerOf2(image.height)) { |
gl.texImage2D
gl.texImage2D(gl.TEXTURE_2D, 0, gl.RGBA, gl.RGBA, gl.UNSIGNED_BYTE, image): Store in the image in the GPU’s texture object. [MDN]
Assigns a texture image to a texture object, and this function also allows to tell the WebGL system about some properties of the image.
gl.uniform1*
gl.uniform1i(uniformVar, texUnit): Specify the texture unit number and pass it to the corresponding texture uniform variable.
❓Possible problem
ERROR: Uniform type does not match uniform method.
gl.uniform1f(u_alpha, alpha): A floating point Number for floating point values.
gl.uniform1i: An integer Number for integer values.
Prone to typo. In my case, the value of alpha is a single floating point number, so the corresponding uniform variable is set using gl.uniform1f.
Texture Mapping
Update Shaders
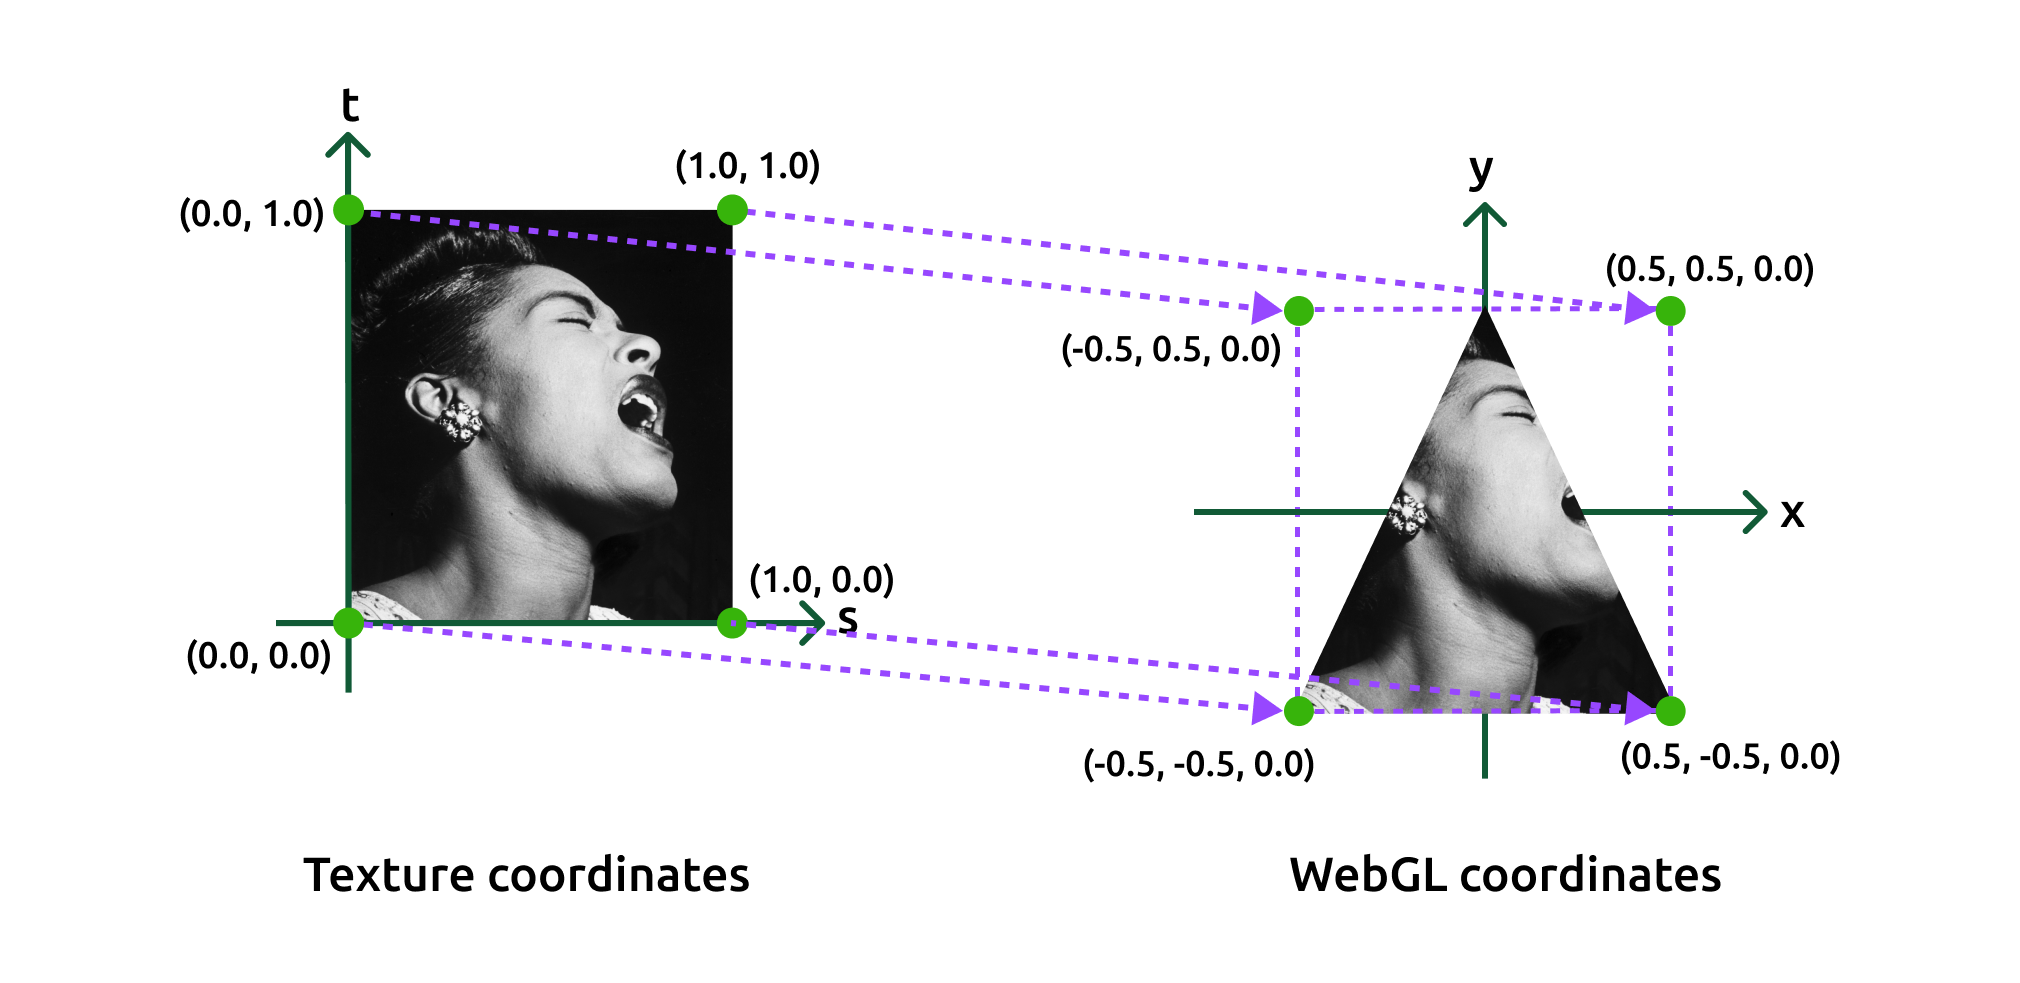
In the vertex shader, creating a varying variable that will interpolate the texture coordinates across the surface of a triangle. In the fragment shader, use the texture coordinates to lookup a color from the texture image. [learnwebgl]
Vertex Shader
Define vertex shader in essl using es6 template strings. Two things will be done here: pass the texture unit to the slice shader; transfer texture coordinates from vertex shader to vertex shader.
1 | const vShaderCode = ` |
Fragment Shader
Define fragment shader in essl using es6 template strings. The GLSL ES built-in function texture2D() is used to get the pixel color from the texture map image by fetching the texel on the texture based on the value of the texture coordinates.
1 | const fsSource = ` |
Depth Test
By default, WebGL handles vertices in the order they are in the buffer in order to speed up drawing operations. If a vertex that is close is drawn first and a vertex that is far away is drawn later, the object that is far away that is drawn later obscures the object that is close instead. Depth monitoring takes the color of the pixel with the smaller z-value as the final drawn color, unless transparent objects need to be drawn, and depth detection is usually turned on.
1 | gl.enable(gl.DEPTH_TEST); |
Alpha Blending
WebGL does not provide alpha blending by default, to turn on alpha blending, WebGL needs to use the source and target colors, and the blended color is calculated by the blending method set in gl.blendFunc. If the 3D scene is drawn with both opaque and translucent objects, the graphics should be drawn as following:
- Enable the hidden surface elimination: gl.enable(gl.DEPTH_TEST);
- Draw all opaque objects;
- Lock the write operation of the depth buffer used for hidden surface elimination so that it is read-only: gl.depthMask(false);
- Draw all translucent objects, noting that they are to be sorted by depth and then drawn from back to front;
- Release the depth buffer to make it readable and writable: gl.depthMask(true).
1
2
3
4
5
6
7
8if (alpha == 1) {
gl.disable(gl.BLEND);
gl.depthMask(true);
} else {
gl.enable(gl.BLEND); // enable alpha blending
gl.blendFunc(gl.SRC_ALPHA, gl.ONE_MINUS_SRC_ALPHA); // premultiplied
gl.depthMask(false); // disable depth mask
}
References:
📮 If find any errors, please feel free to discuss and correct them: biqingsue@[google email].com.